macOS 10.15 Catalinaでのデフォルトシェルをzshに変更
ターミナルでの警告
macOS 10.15 Catalina がリリースされてからしばらくたちますが、ターミナルを立ち上げたところ警告が表示されるようになりました。

今回のアップデートからデフォルトシェルが bash から zshへ変更されたという内容です。 そのまま bash を使用し続けても問題はありませんが、良い機会なので デフォルトシェルを zsh へ変更する手順を記録しておきます。
GUIでシェルを変更
警告画面にあるように、以下のコマンドでただちに使用しているシェルを変更できます。
chsh -s /bin/zsh
ただ、macOSの場合はGUIで設定したほうがスマートです。まずApple メニューから「システム環境設定」を開き、「ユーザとグループ」を選択します。現在のユーザのところにカーソルをあわせ、controlキーを押しながら選択すると「詳細オプション」が表示されますので、それを開きます。

詳細オプションの設定項目のうち、「ログインシェル」がそのユーザが使用するシェルです。これを「/bin/zsh」にします。

以上で次回ログインから zsh がログインシェルとして扱われます。再起動後、ターミナルで警告が消えていることを確認します。

設定の移植
bash で使用される設定ファイル群はそのままでは zsh に反映されません。対応表は以下のようになります。
| bashの設定ファイル名 | zshでの設定ファイル名 | 用途 |
|---|---|---|
| ~/.bash_profile | ~/.zprofile | ログインシェルが起動されたとき最初に適用される。 |
| ~/.bash_profile | ~/.zlogin | ログインシェルの起動時に適用されるが、.zprofileより後に読まれる。 |
| ~/.bashrc | ~/.zshrc | シェルを起動した際その都度適用される。PROMPTの設定はこちらで行うのが最適。 |
| ~/.bash_logout | ~/.zlogout | ログインシェルの終わりに読まれる。 |
ほとんどが bash の設定ファイルの名前を変更するだけで移植できますが、一部記述方法が異なる場合があります。
(参考) プロンプトの記述方法
例えば、 bash で以下のようなプロンプトを使用していたとします。
PS1='\[\e[1;7;32;44m\]\W\[\e[0m\]\[\e[1;32m\]\$\[\e[0m\] '
これを zsh の記述に直すと以下のようになり、記述方法が全く異なります。
PROMPT='%S%{$fg_bold[green]%}%{$bg[blue]%}%1~%{$reset_color%}%s%{$fg_bold[green]%}%(!.#.%%)%{
プロンプトについて独自の表示を行うために見直しは必須です。 以下のサイトが参考になります。
(参考) 補完機能をつける
補完機能の充実さは zsh の最大の特長です。せっかくなのでこれを .zshrc で有効にします。
~/.zshrc
autoload -U compinit
compinit
まとめ
GeoIPデータベースを提供するGeoLite2ライセンス変更の対応
ライセンス形態の変更
以前の記事で、ApacheでGeoIPデータベースを利用する方法を紹介しました。その後、GeoIPデータベースの提供元であるMaxMindでライセンスの変更があり、フリーの利用であってもアカウント登録が必須になったようなので、今回はそのやり方を記事にします。
アカウント登録
まず、以下の GeoLite2 データベースのサイトへアクセスします。
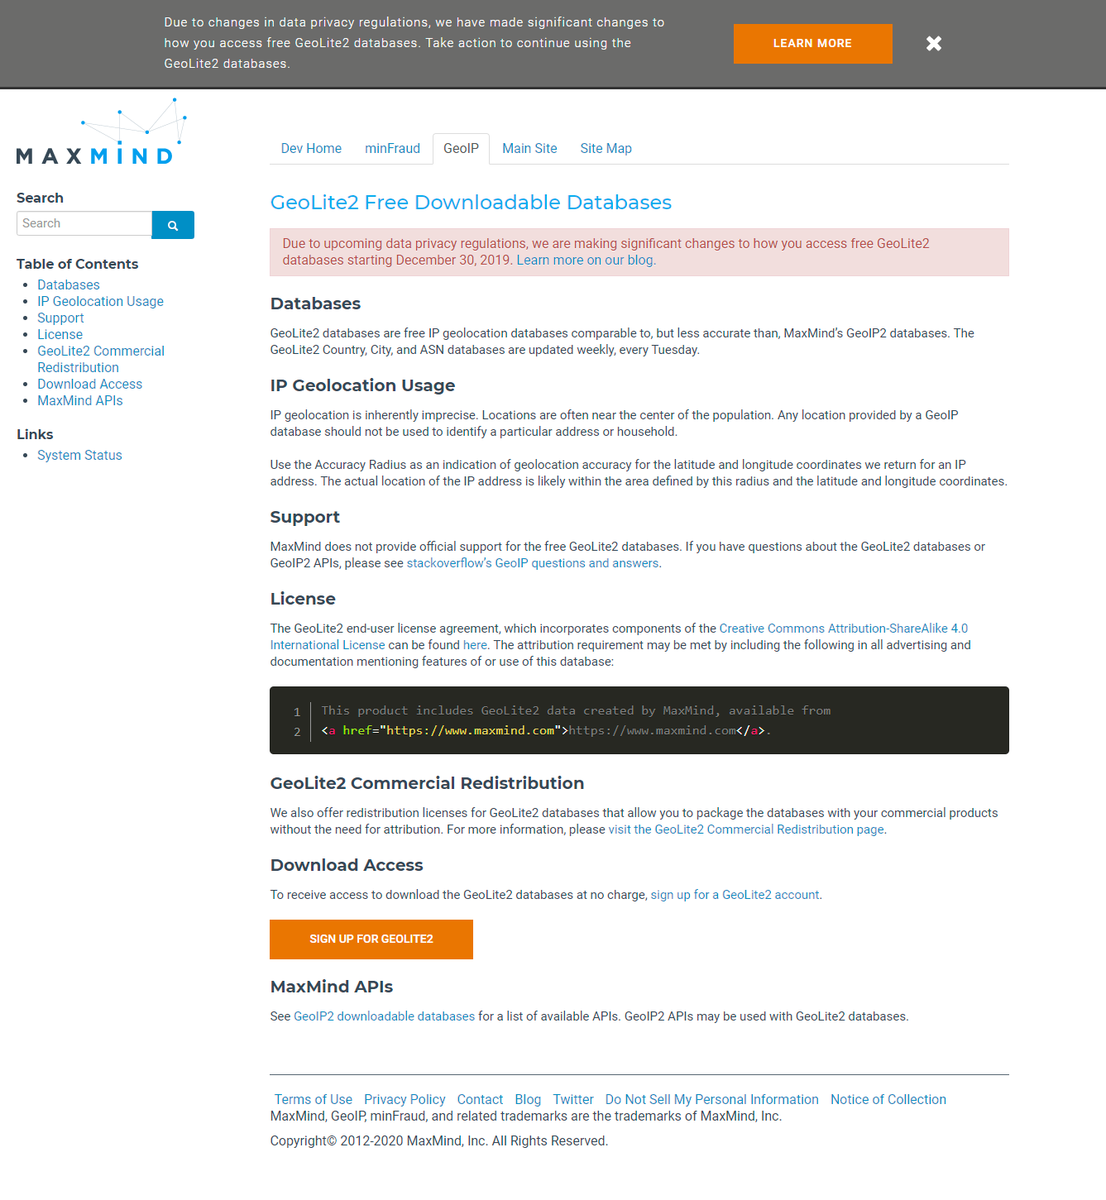
画面下部にある「SIGN UP FOR GEOLITE2」というボタンを押します。

ユーザー情報登録画面になりますので、「Full name(名前)」と「Company(会社名)」、「Industry(職業)」、「Country(国)」、「Intended use(使用目的)」、「Email address(メールアドレス)」を入力します。これらの情報は必須項目です。
「Email address」は確実に送受信できるメールアドレスを入力します。このメールアドレスはユーザー名としても利用されます。
すべて入力後、「Continue」ボタンを押せば、入力したメールアドレス宛てにすぐに以下のようなメールが届きます。
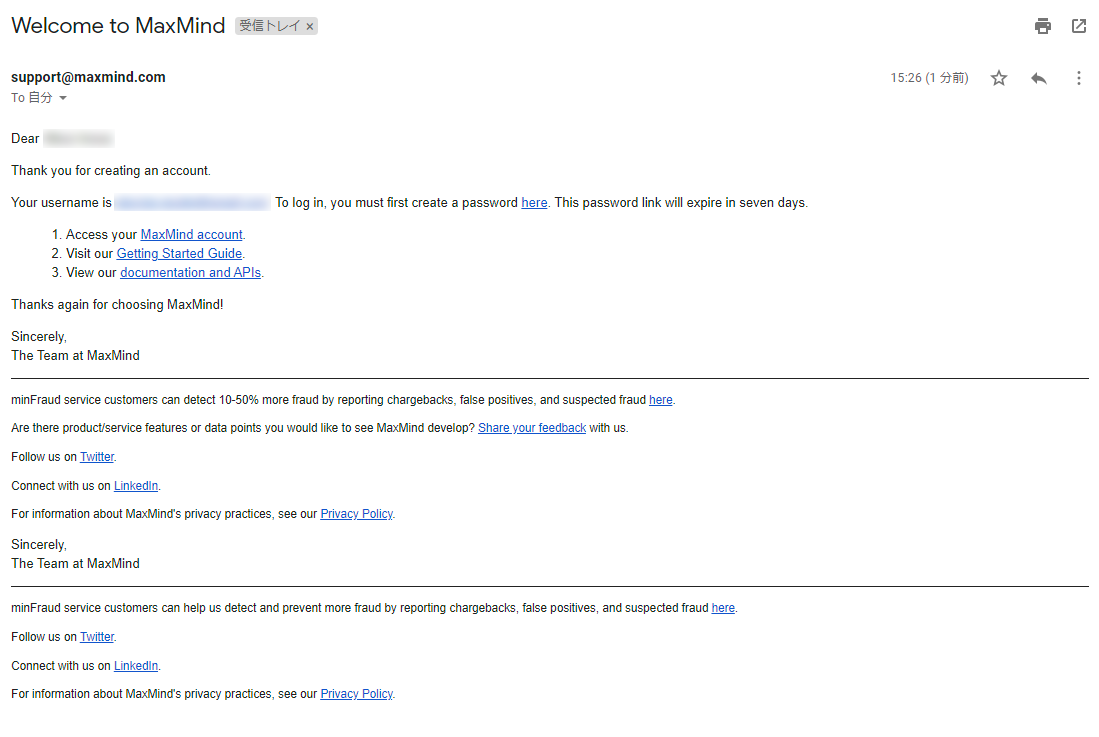
メール本文中に「To log in, you must first create a password here.」と書かれていますが、こちらでまずパスワードの設定が必要です。「here」はリンクになっていますのでクリックするとパスワード作成画面に変遷します。
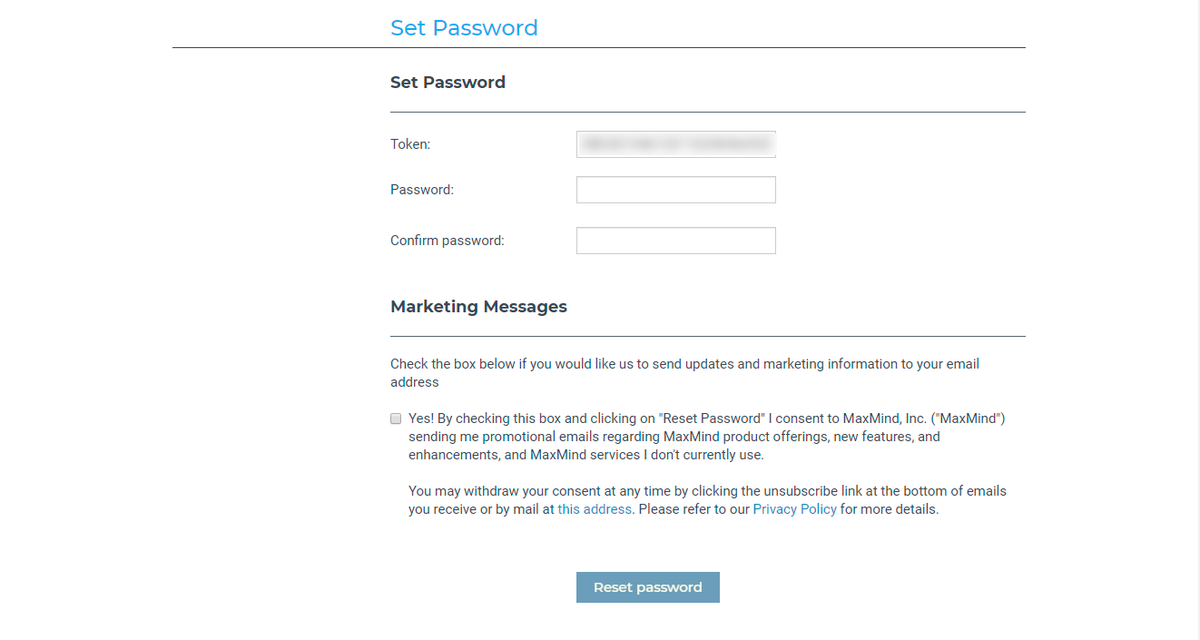
自身で考えたパスワードを「Password」と「Confirm Password」の両方に記入し、「Reset password」を押します。

パスワードが設定され、ログイン画面へのリンクが表示されます。「Click here to log in」を選択します。
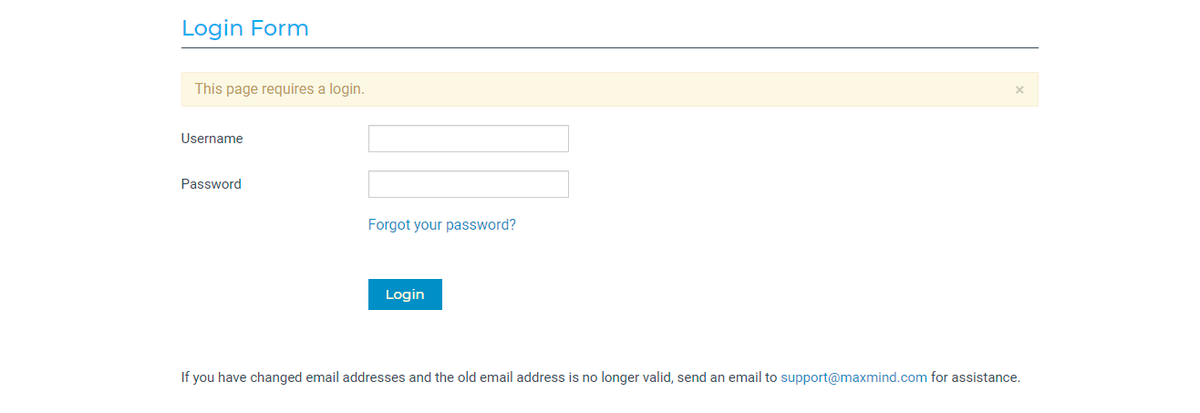
ログイン画面が表示されますので、「Username」に登録時に使用したメールアドレスを記入し、「Password」に今しがた設定したパスワードを入力し「Login」ボタンを押します。
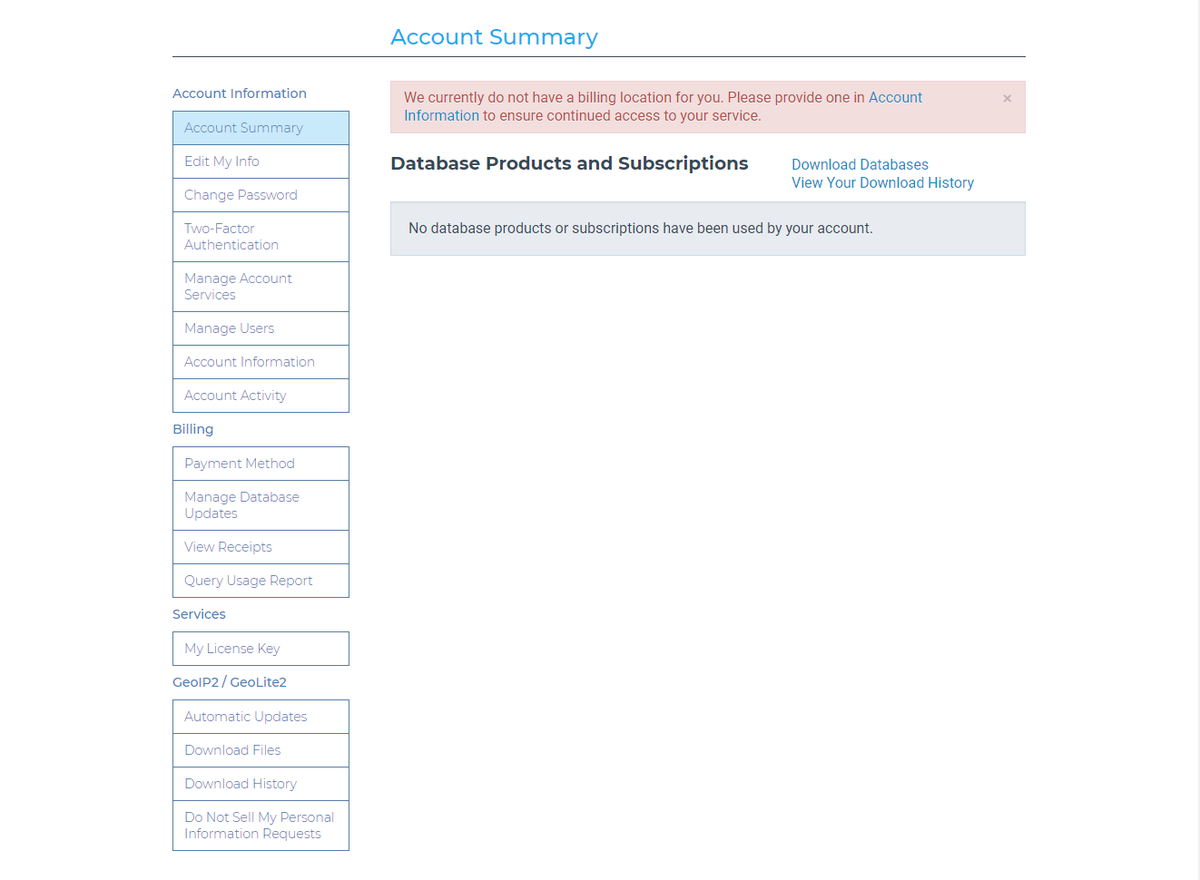
ログインに成功すれば管理画面が表示されます。
ここで左メニュー下部にある「My License Key」を選択します。
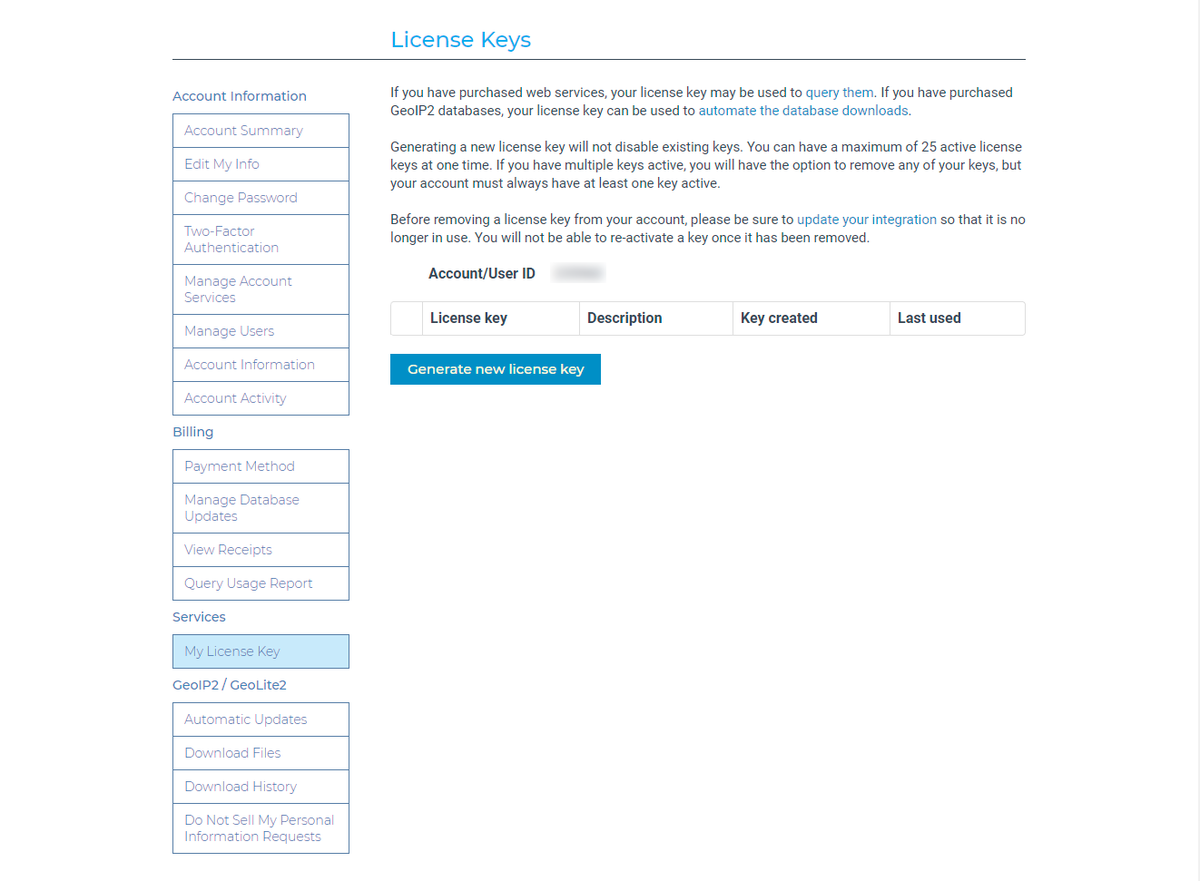
「Generate new license key」ボタンを押します。
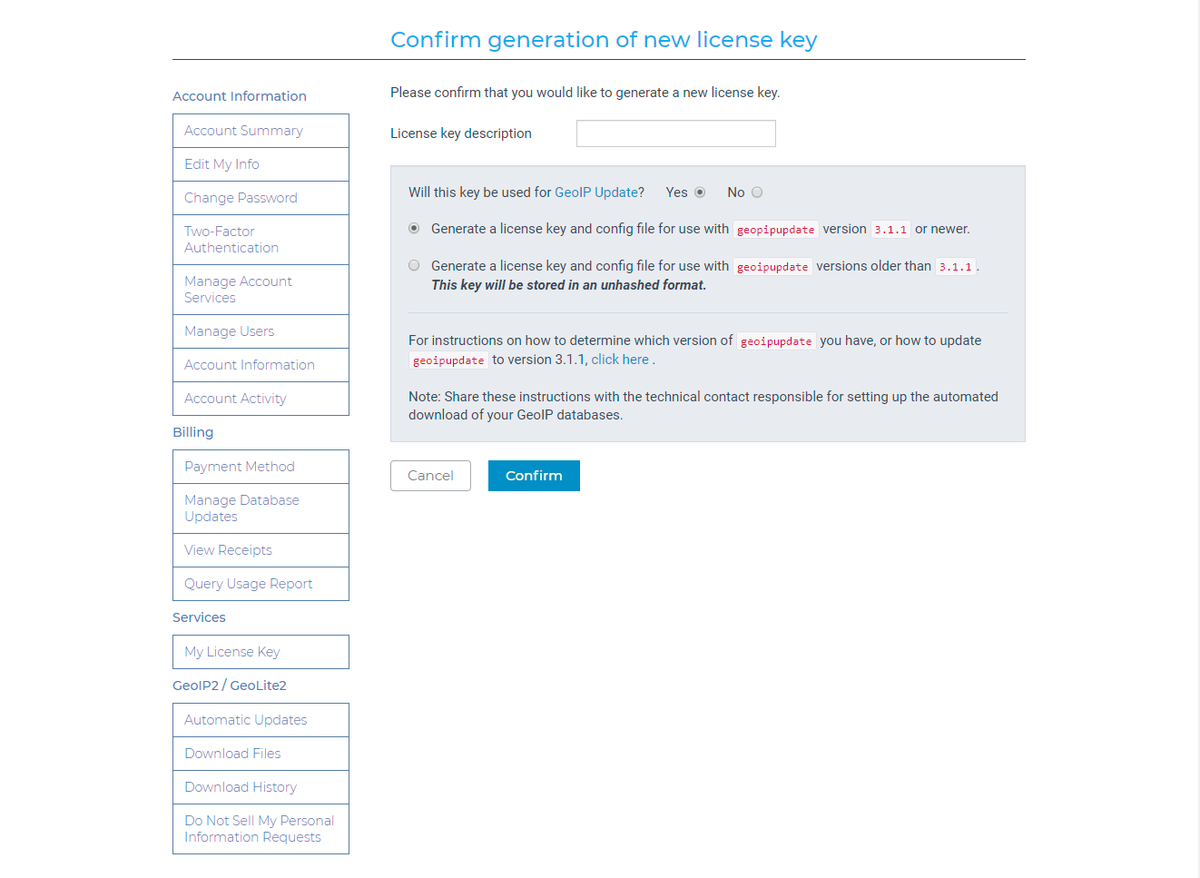
「License key description」にはライセンスキーの名前を自由に入力します。そのライセンスキーをどこで使用するかなど、識別しやすい名前にすると良いでしょう。
その下の設問は geoipupdate で使用するための設定ファイルを生成するものです。特にどちらでも構いませんが、ここでは生成するようにした画面例です。
最後に「Confirm」ボタンを押します。
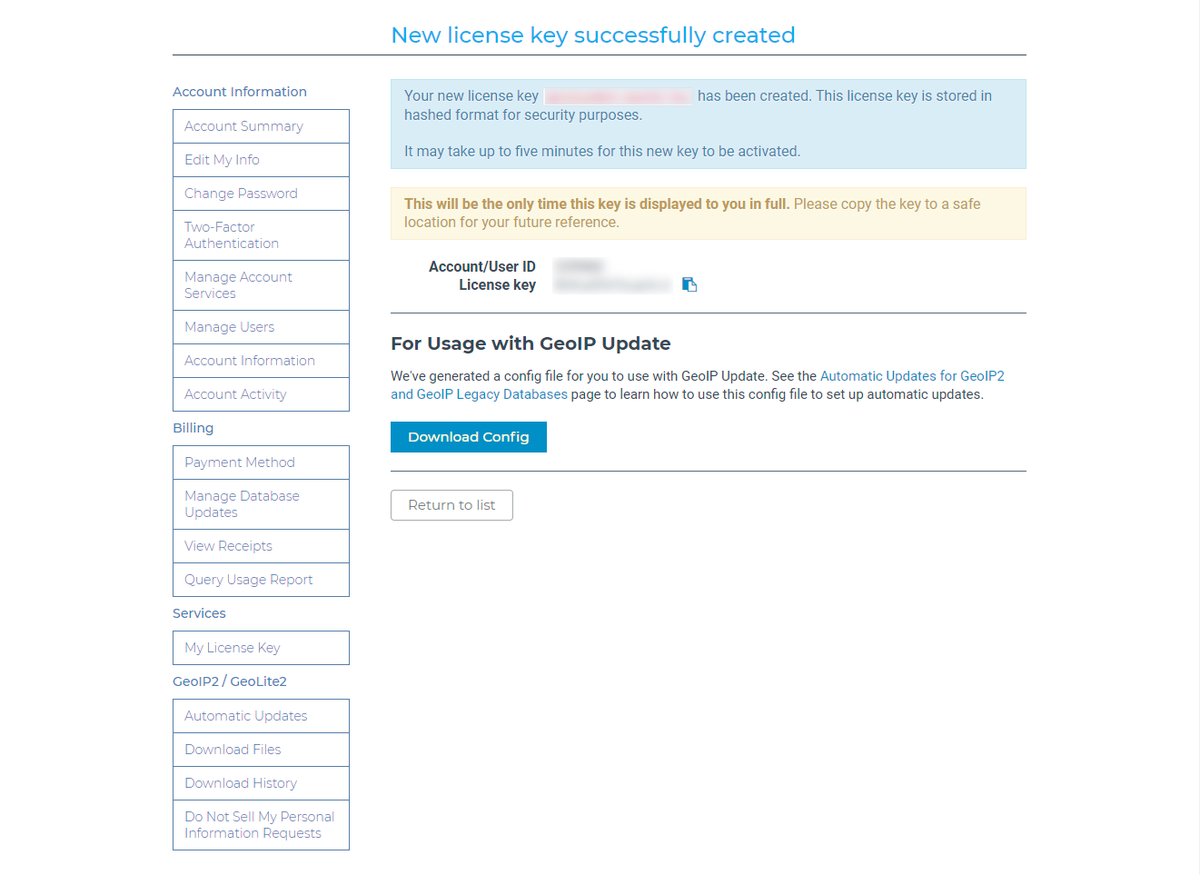
新たなライセンスキーが生成されます。ここで発行された「Account/User ID」と「License key」は後ほど使用します。
「Download Config」ボタンを押せば geoipupdate で使用するための設定ファイル GeoIP.conf がダウンロードできますので、そちらを後の項目で説明する設定ファイルとして使用することもできます。
geoipupdate の設定
以下は Arch Linux での設定例です。
geoipupdate インストール
GeoIPデータベースを Arch Linux で利用するためのツール、 geoipupdate を以下のコマンドでインストールします。
$ pikaur -S geoipupdate
※pikaur はAURヘルパー。 yayやyaourtなどの他のAURヘルパーでも可
/etc/GeoIP.conf
設定ファイル /etc/GeoIP.conf を以下のように編集します。
/etc/GeoIP.conf
# Please see https://dev.maxmind.com/geoip/geoipupdate/ for instructions
# on setting up geoipupdate, including information on how to download a
# pre-filled GeoIP.conf file.

# Replace YOUR_ACCOUNT_ID_HERE and YOUR_LICENSE_KEY_HERE with an active account
# ID and license key combination associated with your MaxMind account. These
# are available from https://www.maxmind.com/en/my_license_key.
AccountID [アカウント登録で取得した「Account/User ID」を指定]
LicenseKey [アカウント登録で取得した「License key」を指定]

# Enter the edition IDs of the databases you would like to update.
# Multiple edition IDs are separated by spaces.
EditionIDs GeoLite2-ASN GeoLite2-City GeoLite2-Country

# The remaining settings are OPTIONAL.

# The directory to store the database files. Defaults to /var/lib/GeoIP
# DatabaseDirectory /var/lib/GeoIP

# The server to use. Defaults to "updates.maxmind.com".
# Host updates.maxmind.com

# The proxy host name or IP address. You may optionally specify a
# port number, e.g., 127.0.0.1:8888. If no port number is specified, 1080
# will be used.
# Proxy 127.0.0.1:8888

# The user name and password to use with your proxy server.
# ProxyUserPassword username:password

# Whether to preserve modification times of files downloaded from the server.
# Defaults to "0".
# PreserveFileTimes 0

# The lock file to use. This ensures only one geoipupdate process can run at a
# time.
# Note: Once created, this lockfile is not removed from the filesystem.
# Defaults to ".geoipupdate.lock" under the DatabaseDirectory.
# LockFile /var/lib/GeoIP/.geoipupdate.lock
geoipupdate の実行
動作確認のため、geoipupdate を手動で実行します。
$ sudo geoipupdate -v
実行後、/var/lib/GeoIP 以下に以下のファイルが存在していれば、正常な動作です。
- GeoLite2-ASN.mmdb
- GeoLite2-City.mmdb
- GeoLite2-Country.mmdb
これらのファイルを Apache で使用する方法については、以下の記事をご参照ください。
定期的にGeoIPデータベースを最新にする
systemdタイマーを使用します。geoipupdate パッケージに含まれています。
$ sudo systemctl start geoipupdate.timer
$ sudo systemctl enable geoipupdate.timer
PowerShell 7.0 がリリースされました

最新の PowerShell
つい先日、Microsoftから最新版の PowerShell がリリースされました。それまでの PowerShell Core から、単に PowerShell 7.0 と変更され、より PowerShell の正統な後継バージョンという色彩が強くなっています。
メジャーバージョンアップとあって様々な大きい変更点がありそうですが、一番目についたのは新たな演算子が追加されたというものです。具体的には行以下に上げるものが新たに使用できるようになりました。
これらの演算子の追加により、真偽やnulや特定値を判定する式がよりシンプルに記述できるようになります。
また、反復処理を行う ForEach-Object に -Parallel という処理を並列に行うパラメータが追加されたり、エラー原因調査のために Get-Error といったコマンドレットが追加されています。
様々なプラットフォームをサポート
最近の PowerShell の開発傾向として、これまで Windows のみのサポートだったものが、LinuxやMacを始めとして様々なプラットフォームに最適化されたパッケージが用意され、クロスプラットフォーム志向が強くなりました。
公式サイトに用意されたインストーラの数を見ても、その様子が伺えます。

公式サポートされたプラットフォームは以下のものです。
- Windows 8.1 / 10
- Wndows Server 2012 / 2012 R2 / 2016 / 2019
- macOS 10.13 (High Sierra) 以降
- Red Hat Enterprise Linux 7 (RHEL7)
- CentOS 8
- Fedora 30 以降
- Debian Linux 9 以降
- Ubuntu 16.04 以降
- Alpine Linux 3.8 以降
変わったところではARM版Windows用のパッケージが用意されていたりします。
クロスプラットフォームが進む反面、元々のWindows に標準で搭載されていた Windows PowerShell とは機能の乖離が進み、今後徐々に互換性が失われていくのではないかと考えられます。
PowerShell 7.0 のインストール
インストール方法はいくつかあります。公式サイトからインストーラをダウンロードして実行するやり方と、Chocolatey等のパッケージ管理ソフト経由からインストールする方法です。
公式サイトからインストーラをダウンロード
以下のサイトからインストーラをダウンロードして実行します。設問に答えていくだけで簡単に導入できます。
様々なプラットフォーム用が用意されていますが、例えば Windows 10 の64ビットバージョンを使用しているならば、ページ下にある「PowerShell-7.0.0-win-x64.msi」をダウンロードします。
Chocolatey からインストール
Chocolatey を使用すれば PowerShell やコマンドライン上からコマンドでインストールすることもできます。以下のようにコマンドを実行します。
choco install powershell-core
PowerShell 7.0 の起動
インストールを完了すると、スタートメニューに以下のメニューが追加され、PowerShell 7.0 が使用できるようになります。

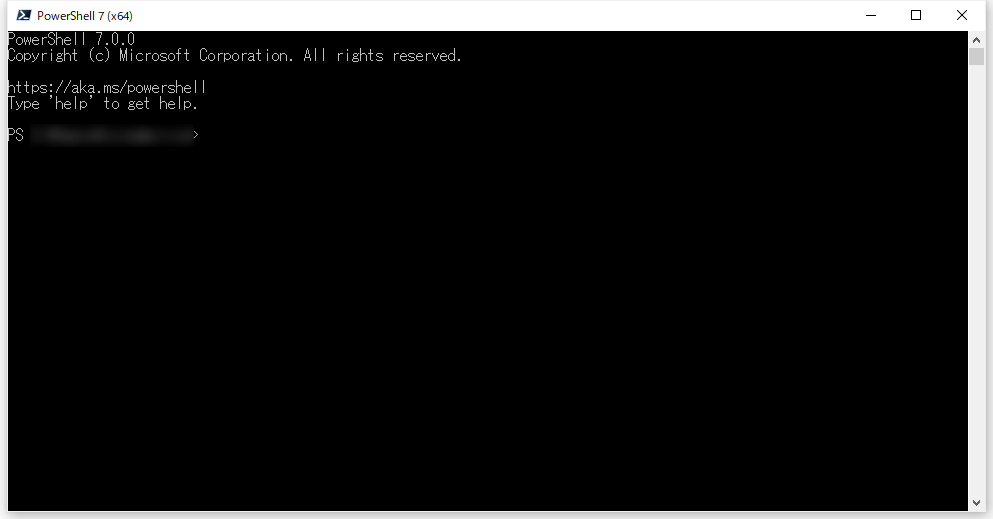
起動してバージョン番号が 7.0.0 となっていればOKです。
PowerShell Core をインストールする
PowerShell Core とは
Windows 10を始めとするモダンWindowsには、従来のコマンドプロンプトに代わり、より高性能なコマンドラインインターフェース(CLI)である Windows PowerShell が搭載されています。
ですが、Windows PowerShell を起動してみると、以下のような警告が表示されることがあります。

「新しいクロスプラットフォームの PowerShell をお試しください」との文言と共に、リンク先が紹介されています。
どうやらこれまでの Windows PowerShell とは別に、新しい PowerShell が開発されているようです。それが今回紹介する PowerShell Core です。
Windows PowerShell と PowerShell Core の違い
これまでの Windows PowerShell はバージョン5.1が最新バージョンです。それに対し、PowerShell Core は6.0以降のバージョン番号が割り振られており、PowerShell の正統な後継アプリとなっていくようです。
PowerShell Core はクロスプラットフォーム
新しく開発されている PowerShell Core はクロスプラットフォームです。これまでの Windows PowerShell はその名の通り Windows のみで動作する専用ツールでしたが、PowerShell Core は Windows の他、LinuxやmacOS、Dockerなど様々なプラットフォームで動作するようになりました。
このように動作する対象のOSが大きく拡張された分、すべてのプラットフォームで共通で動作する機能のみサポートされ、Windows特有の機能が削減されているという違いがあります。そのため今まで Windows PowerShell で使用していたものが一部動かなくなる可能性があります。
今後は PowerShell Core が積極的にバージョンアップしていく
Windows PowerShell は Microsoft 社が専有するクローズドな開発体制でしたが、PowerShell Core はオープンソース化され、世界中の開発者が開発に関わるようになりました。そのため今後も活発な開発が進むものと思われます。
従来の Windows PowerShell はセキュリティアップデートのみのメンテナンスだけで、今後は大幅な機能の向上は期待できません。
Windows 10 であれば、従来の Windows PowerShell と新しい PowerShell Core は共存できます。以下にインストール方法を紹介します。
PowerShell Core のインストール
方法は2つあり、サイトからインストーラをダウンロードし実行する方法と、Chocolatey 経由でインストールする方法があります。
サイトからインストーラをダウンロードし実行
以下のサイトにアクセスします。
ページ中の「Get PowerShell」のリストから適切なインストーラをダウンロードします。大半の方は「Windows (x64)」(64ビット版Windows) の「Downloads (stable)」(安定版バージョン)をダウンロードすれば問題ないはずです。

あとはインストーラを起動し、ウィザードの設問に答えていくことでインストールが自動的に進みます。
Chocolatey 経由でインストール
Chocolatey を導入済みの方は、コマンドラインや PowerShell から、以下のコマンドで直接インストールすることも可能です。
choco install powershell-core
PowerShell Core を実行するために必要なパッケージも同時にインストールされます。
PowerShell Core の起動
Windows PowerShell はスタートメニューの中の「Windows PowerShell」から起動することができました。

同様に、PowerShell Coreもスタートメニューから起動できます。

Windows PowerShell と PowerShell Core は別々のプログラムグループで登録されます。
PowerShell Core の画面は Windows PowerShell とよく似ていますが、デフォルトでは背景が黒くなり、バージョン番号が表示されるようになります。

まとめ
今回は PowerShell Core のインストール方法を紹介しました。現在の PowerShell Core の最新バージョンは 6.2.4 となっていますが、今後もバージョンアップが急ピッチで進んでいくと思われます。
現状では従来の Windows PowerShell の機能をすべて PowerShell Core で代替することはできませんが、将来予定されている「PowerShell Core 7」では互換性が完全にサポートされることを目指して開発されています。今のうちから最近の PowerShell にふれておき準備しておきましょう。
家庭内LANをIPv6対応にするお話 02 - IPv6のアドレスの種類

まえがき
以前の記事で、IPv6 もまたIPアドレスを持ち、IPv4 とは表記の仕方が異なるというお話をしました。しかし、IPv6 ではただ表記が変わるだけではなく、IPアドレス自体にも様々な種類が追加されました。
思い返せば、IPv4 の時代はシンプルでした。IPアドレスといえば、世界中でユニーク(単一しかない)であるグローバルIPアドレスと、家庭内LANや企業内のイントラネットなどで使用されるプライベートIPアドレスくらいしか種類がありませんでした。一方 IPv6 ではその目的によって様々なIPアドレスの種類が増えました。
IPv6 におけるIPアドレスの種類
IPv6のIPアドレスは、以下の分類の仕方によって区別されます。
- 動作による区分
- スコープによる区分
- 特殊なアドレス
同じIPアドレスでも使用目的によりその呼び方が変わってきます。
動作による区分
- ユニキャストアドレス
- マルチキャストアドレス
- エニーキャストアドレス
以上の3つの区分があります。
ユニキャストアドレスは一つのインターフェイスに割り当てられるアドレスで、1対1の通信に使用されます。通常よく使用されるアドレスです。もし通信機器に複数のインターフェイスが備わっている場合は、それぞれユニキャストアドレスを持ちます。
マルチキャストアドレスは1対1通信ではなく、1対N通信です。マルチキャストアドレス向けにパケットを流すと、そのアドレスに属しているグループすべてにパケットが届きます。IPv4 で存在したブロードキャストアドレスは IPv6 ではマルチキャストアドレスに一種として扱われます。ルータを越えて通信することはできません。
エニーキャストアドレスはマルチキャストアドレスと同じくあるグループを表すアドレスですが、そのグループに属しているノードの内一番近いノード一つのみに送信される。
スコープによる区分
スコープとは直訳すれば適用範囲のことで、IPv6 においてはインターネット空間の中でそのIPアドレスが有効な空間の範囲のことを示しています。種類としては以下の3つがあります。
- グローバルスコープ
- リンクローカルスコープ
グローバルスコープは IPv4 にも存在したもので全世界で一意的に決まっていることを示してます。あるグローバルアドレスは世界で一つしかないことが保証されます。
リンクローカルスコープは自身が所属しているネットワークのみで有効なスコープで、ルータを越えて通信はできません。
特殊なアドレス
その他にも、以下の種類のアドレスがあります。
- 未指定アドレス
- ループバックアドレス
- IPv4 射影アドレス
未指定アドレスは以下の形式のアドレスです。
0000:0000:0000:0000:0000:0000:0000:0000 (略記では「::」)
つまりすべて 0 のアドレスで、システムがまだアドレスが割り当てられていない状態を示しています。
ループバックアドレスは通信機器が自分自身を示したアドレスで、 IPv4 では「127.0.0.1」として知られていました。IPv6 では以下の形式になります。
0000:0000:0000:0000:0000:0000:0000:0001 (略記では「::1」)
IPv4 射影アドレスは IPv6 対応ノードが IPv4 しか対応していないノードに対して通信する際に使用されるアドレスです。例として以下のような形式をとります。
例) ::ffff:192.168.1.1
IPv6 アドレスの後に IPv4アドレスが付け加えられていることがわかります。IPv6 環境と IPv4 環境を共存させるために互換性のために存在します。
実際に使用されているアドレス
以上、IPv6 のIPアドレスには様々な種類があることを示しましたが、これらの概念を組み合わせて IPv6 の運用上では次にあげるような名称がよく使用されます。
- グローバルユニキャストアドレス
- リンクローカルユニキャストアドレス
- ユニークローカルユニキャストアドレス
グローバルユニキャストアドレスはルータを越えてインターネット上で通信可能なアドレス。1対1通信。
リンクローカルユニキャストアドレスはいわゆる ULA と呼称し、IPv6 で導入された新しい概念です。IPv4 でいうところのプライベートアドレスに近いものです。ただし IPv4 では別組織で同じアドレスが使用されることが許されていましたが、ULA の場合はアドレスが重複することはほぼありません。「fe80::/10」のアドレスが使用されます。
ユニークローカルユニキャストアドレスは IPv4 のプライベートIPアドレスの概念に近いもので、IPv4 では APIPA(プライベートアドレス自動設定機能)で 「169.254.x.x」 といった形式のアドレスが自動的に割り当てられることがありましたが、同様の種類のアドレスです。インターネット上では使用できません。「fc00::/7」のアドレスが使用されます。
まとめ
IPv6 では様々な種類のアドレスが存在します。 IPv4 のころに比べれば種類も増え、新しい概念も導入されているのでなかなか理解が難しいところがありますが、IPv6 の環境を整えるためには必須の知識です。これらのことを踏まえ、次回は IPv6 アドレスの実際の割り当て方を解説していきます。
NSDをchroot対応にする
chroot
前回の記事で、家庭内LAN向けDNSサーバをNSDを使用し構築しました。今回はこちらを chroot 化する方法を紹介します。
chroot とは、Wikipediaによれば次のように説明されています。
UNIXオペレーティングシステムにおいて、現在のプロセスとその子プロセス群に対してルートディレクトリを変更する操作である。ルートディレクトリを別のディレクトリに変更されたプロセスは、その範囲外のファイルにはアクセスできなくなるため、この操作をchroot監獄などとも呼ぶ。
通常のサービスはファイルシステム上の /etc /usr などの規定のディレクトリ内に配置された実行ファイルから起動されますが、chroot はそういったファイルシステムとは切り離され、独立したファイルシステムの体系を持つことができます。そうすることで例えそのサービスが外部から攻撃され乗っ取られたとしても、外部のファイルシステムには悪影響を及ぼさないよう最小限の被害に抑えることを目的に利用されます。
Webサーバである Apache、 DBサーバである MySQL などでよく使われる手法ですが、今回は NSD を chroot 化します。対象のOSは Arch Linux です。
NSD の設定
NSD の関連ファイル群のコピー
NSD のインストールは既に済ませているものとします。
chroot を行うには chroot用のディレクトリを別に用意します。今回は chroot 化した NSD のルートディレクトリを /srv/nsd とし、そこへ NSDの関連ファイル群をコピーします。
ゾーンファイルについては、前回の記事で作成したものをそのまま利用します。
以下にその手順を示します。
$ sudo mkdir /srv/nsd
$ cd /srv/nsd
$ sudo mkdir -p {etc,run,tmp,var}
$ sudo mkdir -p etc/nsd etc/nsd/nsd.conf.d etc/nsd/zones run/nsd var/db var/db/nsd
$ sudo cp /etc/nsd/nsd.conf.sample etc/nsd/nsd.conf
$ sudo cp -r /etc/nsd/nsd.conf.d/* /srv/nsd/etc/nsd/nsd.conf.d
$ sudo cp -r /etc/nsd/zones /* /srv/nsd/etc/nsd/zones
ユーザとグループについても新規作成します。ユーザとグループの作成方法はここでは割愛します。
以下の例はユーザ、グループともに nsd とし、関連ファイル群をすべて所有権を変更します。
$ cd /srv
$ sudo chown -R nsd:nsd ./nsd
$ sudo ln -s /srv/nsd/etc/nsd/nsd.conf /etc/nsd.conf
ディレクトリ構造
ディレクトリ /srv/nsd 以下のディレクトリ構造は以下のようになります。
nsd
├── etc
│   └── nsd
│       ├── nsd.conf
│       ├── nsd.conf.d
│       │   ├── zone-example.conf
│       │   └── zone-example.rev.conf
│       └── zones
│           ├── example.com.zone
│           └── eample.com.rev.zone
├── run
│   └── nsd
├── tmp
└── var
    └── db
        └── nsd
設定ファイル nsd.conf
NSD の設定は nsd.conf で行います。場所は /srv/nsd/etc/nsd/nsd.conf であることに注意します。
- server-count
DNSサーバのCPUコア数に合わせて数値を変更します。
例)server-count: 4
- ip-address
例)ip-address: 192.168.1.100
- ip-freebind
サーバ機起動時にnsdサービスが起動しない場合、このパラメータをyesにすることで解決することがある。
例)ip-freebind: yes
- do-ip4
IPv4を使用する。
例)do-ip4: yes
- username
NSDサービスを動作させるユーザ名を指定します。先に同名のユーザを作成しておく必要があります。
例)username: nsd
chroot 化した NSD で、コピーした関連ファイル群のトップディレクトリを指定。
- zonesdir
ゾーンファイルを格納するディレクトリです。ゾーンファイルの実際の場所に合わせて変更します。chroot 用のディレクトリを絶対指定します。
例)zonesdir: "/srv/nsd/etc/nsd/zones"
- zonelistfile
ゾーンリストファイルを指定します。 chroot 用の場所を絶対指定します。
例)zonelistfile: "/srv/nsd/var/db/nsd/zone.list"
- database
NSD で生成するデータベースのファイル名を指定します。 chroot 用の場所を絶対指定します。
例)database: "/srv/nsd/var/db/nsd/nsd.db"
- pidfile
NSD のプロセス管理用ファイルの場所を指定します。chroot 用の場所を絶対指定します。
例)pidfile: "/srv/nsd/run/nsd/nsd.pid"
- xrfdfile
ゾーン転送のステータスファイルの場所を指定します。chroot 用の場所を絶対指定します。
例)xfrdfile: "/srv/nsd/var/db/nsd/xfrd.state"
- xfrdir
ゾーン転送情報の一時保管のディレクトリです。chroot 用のディレクトリを絶対指定します。
- hide-version
問い合わせ時にバージョン情報を秘匿します。
例)hide-version: yes
- ゾーンファイルの設定については外部のファイルに切り出し
ゾーンファイルについての設定ファイルのディレクトリを include で指定します。chroot 用のディレクトリを絶対指定します。
例)include: "/srv/nsd/etc/nsd/nsd.conf.d/*.conf"
nsd.conf の全体の設定例は以下の通りです。
#
# nsd.conf -- the NSD(8) configuration file, nsd.conf(5).
#
# Copyright (c) 2001-2011, NLnet Labs. All rights reserved.
#
# See LICENSE for the license.
#

# This is a comment.
# Sample configuration fileA
# include: "file" # include that file's text over here.  Globbed, "*.conf"

# options for the nsd server
server:
    # Number of NSD servers to fork.  Put the number of CPUs to use here.
    server-count: 4

    # uncomment to specify specific interfaces to bind (default are the
    # wildcard interfaces 0.0.0.0 and ::0).
    # For servers with multiple IP addresses, list them one by one,
    # or the source address of replies could be wrong.
    # Use ip-transparent to be able to list addresses that turn on later.
    # ip-address: 1.2.3.4
    # ip-address: 1.2.3.4@5678
    # ip-address: 12fe::8ef0
    ip-address: 192.168.1.100

    # Allow binding to non local addresses. Default no.
    # ip-transparent: no

    # Allow binding to addresses that are down.  Default no.
    ip-freebind: yes

    # use the reuseport socket option for performance. Default no.
    # reuseport: no

    # enable debug mode, does not fork daemon process into the background.
    # debug-mode: no

    # listen on IPv4 connections
    do-ip4: yes

    # listen on IPv6 connections
    # do-ip6: yes

    # port to answer queries on. default is 53.
    port: 53

    # Verbosity level.
    # verbosity: 0

    # After binding socket, drop user privileges.
    # can be a username, id or id.gid.
    username: nsd

    # Run NSD in a chroot-jail.
    # make sure to have pidfile and database reachable from there.
    # by default, no chroot-jail is used.
    chroot: "/srv/nsd"

    # The directory for zonefile: files.  The daemon chdirs here.
    zonesdir: "/srv/nsd/etc/nsd/zones"

    # the list of dynamically added zones.
    zonelistfile: "/srv/nsd/var/db/nsd/zone.list"

    # the database to use
    # if set to "" then no disk-database is used, less memory usage.
    database: "/srv/nsd/var/db/nsd/nsd.db"

    # log messages to file. Default to stderr and syslog (with
    # facility LOG_DAEMON).  stderr disappears when daemon goes to bg.
    # logfile: "//var/log/nsd.log"

    # File to store pid for nsd in.
    pidfile: "/srv/nsd/run/nsd/nsd.pid"

    # The file where secondary zone refresh and expire timeouts are kept.
    # If you delete this file, all secondary zones are forced to be
    # 'refreshing' (as if nsd got a notify).  Set to "" to disable.
    xfrdfile: "/srv/nsd/var/db/nsd/xfrd.state"

    # The directory where zone transfers are stored, in a subdir of it.
    xfrdir: "/srv/nsd/tmp"

    # don't answer VERSION.BIND and VERSION.SERVER CHAOS class queries
    # hide-version: no
    hide-version: yes

    # version string the server responds with for chaos queries.
    # default is 'NSD x.y.z' with the server's version number.
    # version: "NSD"

    # identify the server (CH TXT ID.SERVER entry).
    # identity: "unidentified server"
    identity: "Home network authoritative DNS"

    # NSID identity (hex string, or "ascii_somestring"). default disabled.
    # nsid: "aabbccdd"

    # Maximum number of concurrent TCP connections per server.
    # tcp-count: 100

    # Maximum number of queries served on a single TCP connection.
    # By default 0, which means no maximum.
    # tcp-query-count: 0

    # Override the default (120 seconds) TCP timeout.
    # tcp-timeout: 120

    # Maximum segment size (MSS) of TCP socket on which the server
    # responds to queries. Default is 0, system default MSS.
    # tcp-mss: 0

    # Maximum segment size (MSS) of TCP socket for outgoing AXFR request.
    # Default is 0, system default MSS.
    # outgoing-tcp-mss: 0

    # Preferred EDNS buffer size for IPv4.
    # ipv4-edns-size: 4096

    # Preferred EDNS buffer size for IPv6.
    # ipv6-edns-size: 4096

    # statistics are produced every number of seconds. Prints to log.
    # Default is 0, meaning no statistics are produced.
    # statistics: 3600

    # Number of seconds between reloads triggered by xfrd.
    # xfrd-reload-timeout: 1

    # log timestamp in ascii (y-m-d h:m:s.msec), yes is default.
    # log-time-ascii: yes

    # round robin rotation of records in the answer.
    # round-robin: no

    # minimal-responses only emits extra data for referrals.
    # minimal-responses: no

    # refuse queries of type ANY.  For stopping floods.
    # refuse-any: no

    # check mtime of all zone files on start and sighup
    # zonefiles-check: yes

    # write changed zonefiles to disk, every N seconds.
    # default is 0(disabled) or 3600(if database is "").
    # zonefiles-write: 3600

    # RRLconfig
    # Response Rate Limiting, size of the hashtable. Default 1000000.
    # rrl-size: 1000000

    # Response Rate Limiting, maximum QPS allowed (from one query source).
    # If set to 0, ratelimiting is disabled. Also set
    # rrl-whitelist-ratelimit to 0 to disable ratelimit processing.
    # Default is on.
    # rrl-ratelimit: 200

    # Response Rate Limiting, number of packets to discard before
    # sending a SLIP response (a truncated one, allowing an honest
    # resolver to retry with TCP). Default is 2 (one half of the
    # queries will receive a SLIP response, 0 disables SLIP (all
    # packets are discarded), 1 means every request will get a
    # SLIP response.  When the ratelimit is hit the traffic is
    # divided by the rrl-slip value.
    # rrl-slip: 2

    # Response Rate Limiting, IPv4 prefix length. Addresses are
    # grouped by netblock.
    # rrl-ipv4-prefix-length: 24

    # Response Rate Limiting, IPv6 prefix length. Addresses are
    # grouped by netblock.
    # rrl-ipv6-prefix-length: 64

    # Response Rate Limiting, maximum QPS allowed (from one query source)
    # for whitelisted types. Default is on.
    # rrl-whitelist-ratelimit: 2000
    # RRLend

# Remote control config section.
# remote-control:
    # Enable remote control with nsd-control(8) here.
    # set up the keys and certificates with nsd-control-setup.
    # control-enable: no

    # what interfaces are listened to for control, default is on localhost.
    # control-interface: 127.0.0.1
    # control-interface: ::1

    # port number for remote control operations (uses TLS over TCP).
    # control-port: 8952

    # nsd server key file for remote control.
    # server-key-file: "//etc/nsd/nsd_server.key"

    # nsd server certificate file for remote control.
    # server-cert-file: "//etc/nsd/nsd_server.pem"

    # nsd-control key file.
    # control-key-file: "//etc/nsd/nsd_control.key"

    # nsd-control certificate file.
    # control-cert-file: "//etc/nsd/nsd_control.pem"


# Secret keys for TSIGs that secure zone transfers.
# You could include: "secret.keys" and put the 'key:' statements in there,
# and give that file special access control permissions.
#
# key:
    # The key name is sent to the other party, it must be the same
    #name: "keyname"
    # algorithm hmac-md5, or sha1, sha256, sha224, sha384, sha512
    #algorithm: sha256
    # secret material, must be the same as the other party uses.
    # base64 encoded random number.
    # e.g. from dd if=/dev/random of=/dev/stdout count=1 bs=32 | base64
    #secret: "K2tf3TRjvQkVCmJF3/Z9vA=="


# Patterns have zone configuration and they are shared by one or more zones.
#
# pattern:
    # name by which the pattern is referred to
    #name: "myzones"
    # the zonefile for the zones that use this pattern.
    # if relative then from the zonesdir (inside the chroot).
    # the name is processed: %s - zone name (as appears in zone:name).
    # %1 - first character of zone name, %2 second, %3 third.
    # %z - topleveldomain label of zone, %y, %x next labels in name.
    # if label or character does not exist you get a dot '.'.
    # for example "%s.zone" or "zones/%1/%2/%3/%s" or "secondary/%z/%s"
    #zonefile: "%s.zone"

    # If no master and slave access control elements are provided,
    # this zone will not be served to/from other servers.

    # A master zone needs notify: and provide-xfr: lists.  A slave
    # may also allow zone transfer (for debug or other secondaries).
    # notify these slaves when the master zone changes, address TSIG|NOKEY
    # IP can be ipv4 and ipv6, with @port for a nondefault port number.
    #notify: 192.0.2.1 NOKEY
    # allow these IPs and TSIG to transfer zones, addr TSIG|NOKEY|BLOCKED
    # address range 192.0.2.0/24, 1.2.3.4&255.255.0.0, 3.0.2.20-3.0.2.40
    #provide-xfr: 192.0.2.0/24 my_tsig_key_name
    # set the number of retries for notify.
    #notify-retry: 5

    # uncomment to provide AXFR to all the world
    # provide-xfr: 0.0.0.0/0 NOKEY
    # provide-xfr: ::0/0 NOKEY

    # A slave zone needs allow-notify: and request-xfr: lists.
    #allow-notify: 2001:db8::0/64 my_tsig_key_name
    # By default, a slave will request a zone transfer with IXFR/TCP.
    # If you want to make use of IXFR/UDP use: UDP addr tsigkey
    # for a master that only speaks AXFR (like NSD) use AXFR addr tsigkey
    #request-xfr: 192.0.2.2 the_tsig_key_name
    # Attention: You cannot use UDP and AXFR together. AXFR is always over
    # TCP. If you use UDP, we higly recommend you to deploy TSIG.
    # Allow AXFR fallback if the master does not support IXFR. Default
    # is yes.
    #allow-axfr-fallback: yes
    # set local interface for sending zone transfer requests.
    # default is let the OS choose.
    #outgoing-interface: 10.0.0.10
    # limit the refresh and retry interval in seconds.
    #max-refresh-time: 2419200
    #min-refresh-time: 0
    #max-retry-time: 1209600
    #min-retry-time: 0
    # Slave server tries zone transfer to all masters and picks highest
    # zone version available, for when masters have different versions.
    #multi-master-check: no

    # limit the zone transfer size (in bytes), stops very large transfers
    # 0 is no limits enforced.
    # size-limit-xfr: 0

    # if compiled with --enable-zone-stats, give name of stat block for
    # this zone (or group of zones).  Output from nsd-control stats.
    # zonestats: "%s"

    # if you give another pattern name here, at this point the settings
    # from that pattern are inserted into this one (as if it were a
    # macro).  The statement can be given in between other statements,
    # because the order of access control elements can make a difference
    # (which master to request from first, which slave to notify first).
    #include-pattern: "common-masters"


# Fixed zone entries.  Here you can config zones that cannot be deleted.
# Zones that are dynamically added and deleted are put in the zonelist file.
#
#zone:
    # name: "example.com"
    # you can give a pattern here, all the settings from that pattern
    # are then inserted at this point
    # include-pattern: "master"
    # You can also specify (additional) options directly for this zone.
    # zonefile: "example.com.zone"
    # request-xfr: 192.0.2.1 example.com.key

    # RRLconfig
    # Response Rate Limiting, whitelist types
    # rrl-whitelist: nxdomain
    # rrl-whitelist: error
    # rrl-whitelist: referral
    # rrl-whitelist: any
    # rrl-whitelist: rrsig
    # rrl-whitelist: wildcard
    # rrl-whitelist: nodata
    # rrl-whitelist: dnskey
    # rrl-whitelist: positive
    # rrl-whitelist: all
    # RRLend

# zone configuration files
include: "/srv/nsd/etc/nsd/nsd.conf.d/*.conf"
NSDの起動
systemd を利用し NSD を起動します。
$ sudo systemctl start nsd
以下で正常に起動していることを確認します。
$ systemctl status nsd

● nsd.service - NSD Name Server Daemon
     Loaded: loaded (/usr/lib/systemd/system/nsd.service; enabled; vendor preset: disabled)
     Active: active (running) since Thu 2020-01-23 18:54:32 JST; 4h 20min ago
   Main PID: 416 (nsd)
      Tasks: 6 (limit: 18787)
     Memory: 214.9M
     CGroup: /system.slice/nsd.service
             ├─416 /usr/bin/nsd -d -c /etc/nsd/nsd.conf
             ├─422 /usr/bin/nsd -d -c /etc/nsd/nsd.conf
             ├─506 /usr/bin/nsd -d -c /etc/nsd/nsd.conf
             ├─508 /usr/bin/nsd -d -c /etc/nsd/nsd.conf
             ├─509 /usr/bin/nsd -d -c /etc/nsd/nsd.conf
             └─510 /usr/bin/nsd -d -c /etc/nsd/nsd.conf

 1月 23 18:54:32 systemd[1]: Started NSD Name Server Daemon.
Active の項目が active (running) となっていれば正常起動しています。
システム起動時に自動的に NSD を起動する場合は以下のようにします。
$ sudo systemctl enable nsd
家庭内LANに名前解決のみを行うDNSサーバを設置する
DNSの役割
インターネットに接続されている機器はすべてネット上の住所であるIPアドレスを持っています。IPアドレスは「XXX.XXX.XXX.XXX」(Xは数字)の形式で、例えば「123.456.789.0」のように書き、ブラウザでアクセスする場合は「http://123.456.789.0」といった形になります。
リモートホストにアクセスするためにIPアドレスを知ればいいのですが、数字とピリオドのみの形式では人が覚えるにはどうにも使い勝手が悪い。そのため、それぞれの持つIPアドレスを人がわかりやすい、覚えやすい形式に対応させるための仕組みが、DNSとなります。
例えば、さきほどの「123.456.789.0」のIPアドレスに「example.com」という名前を割り振れば、ブラウザでアクセスする際、「http://example.com」と書けばよくなり、はるかに視認性が高くなります。
家庭内LANの構成図

ここで一例として、以上のような家庭内LANを想定します。HGW兼ルーター以下にスイッチを通してサーバーやPCやプリンター、モバイル機などがぶら下がり、同一のサブネットを構成しています。各ホストには固定のIPアドレスが割り振られているとし、IPアドレスでのアクセスは正常にできるものとします。
ここでホストの一つをDNSサーバとし、各ホストをホスト名とドメイン名で名前を引けるようにしていきます。
BINDとNSD
DNSは様々な機能があります。IPアドレスからホスト名を引く機能を持つDNSサーバは正確にはDNSコンテンツサーバといわれます。その他にもDNSには以下のような機能が存在します。
これらすべてのDNS機能を持つDNSサーバソフト、いわばフルスペックのソフトがBINDと呼ばれるものです。BINDは古くから開発され、DNSSECなどの新機能も取り入れられ、現在もっとも使用されているDNSサーバです。しかし、その歴史ゆえに極めて複雑な仕様となっており、インストールし設定を行うまでたいへんな苦労を要します。
BINDに対し、比較的シンプルでDNSコンテンツサーバ機能のみに特化したDNSサーバソフトがNSDです。機能がシンプルな分インストールや設定も比較的容易であり、動作も軽快です。
今回のケースではIPアドレスからホスト名が引ければ良いだけなので、その機能に特化したNSDを使用するのが最適と考えました。もしその他のDNS機能を必要とする場合は、NSD+Unboundという組み合わせであればBINDに匹敵するようなDNSを提供することもできます。
Arch Linux で NSD をインストール
以下のコマンドで nsd のパッケージがインストールされます。
$ pikaur -S nsd
※pikaur はAURヘルパーであり、pacmanの互換です。その他のAURヘルパーでも同様
設定ファイル nsd.conf
設定ファイルは /etc/nsd/nsd.conf で行います。変更箇所は以下です。
- server-count
DNSサーバのCPUコア数に合わせて数値を変更します。
例)server-count: 4
- ip-address
例)ip-address: 192.168.1.100
- ip-freebind
サーバ機起動時にnsdサービスが起動しない場合、このパラメータをyesにすることで解決することがある。
例)ip-freebind: yes
- do-ip4
IPv4を使用する。
例)do-ip4: yes
- username
NSDサービスを動作させるユーザ名を指定します。先に同名のユーザを作成しておく必要があります。
例)username: nsd
- zonesdir
ゾーン情報ファイルを格納するディレクトリです。ゾーンファイルの実際の場所に合わせて変更します。
例)zonesdir: "//etc/nsd/zones"
- hide-version
問い合わせ時にバージョン情報を秘匿します。
例)hide-version: yes
- ゾーンファイルの設定については外部のファイルに切り出し
ゾーンファイルについての設定ファイルのディレクトリを include で指定します。
例)include: "etc/nsd/nsd.conf.d/*.conf"
nsd.conf の全体の設定例は以下の通りです。
#
# nsd.conf -- the NSD(8) configuration file, nsd.conf(5).
#
# Copyright (c) 2001-2011, NLnet Labs. All rights reserved.
#
# See LICENSE for the license.
#

# This is a comment.
# Sample configuration fileA
# include: "file" # include that file's text over here.  Globbed, "*.conf"

# options for the nsd server
server:
    # Number of NSD servers to fork.  Put the number of CPUs to use here.
    server-count: 4

    # uncomment to specify specific interfaces to bind (default are the
    # wildcard interfaces 0.0.0.0 and ::0).
    # For servers with multiple IP addresses, list them one by one,
    # or the source address of replies could be wrong.
    # Use ip-transparent to be able to list addresses that turn on later.
    # ip-address: 1.2.3.4
    # ip-address: 1.2.3.4@5678
    # ip-address: 12fe::8ef0
    ip-address: 192.168.1.100

    # Allow binding to non local addresses. Default no.
    # ip-transparent: no

    # Allow binding to addresses that are down.  Default no.
    ip-freebind: yes

    # use the reuseport socket option for performance. Default no.
    # reuseport: no

    # enable debug mode, does not fork daemon process into the background.
    # debug-mode: no

    # listen on IPv4 connections
    do-ip4: yes

    # listen on IPv6 connections
    # do-ip6: yes

    # port to answer queries on. default is 53.
    port: 53

    # Verbosity level.
    # verbosity: 0

    # After binding socket, drop user privileges.
    # can be a username, id or id.gid.
    username: nsd

    # Run NSD in a chroot-jail.
    # make sure to have pidfile and database reachable from there.
    # by default, no chroot-jail is used.
    # chroot: "//etc/nsd"

    # The directory for zonefile: files.  The daemon chdirs here.
    zonesdir: "//etc/nsd/zones"

    # the list of dynamically added zones.
    # zonelistfile: "//var/db/nsd/zone.list"

    # the database to use
    # if set to "" then no disk-database is used, less memory usage.
    # database: "//var/db/nsd/nsd.db"

    # log messages to file. Default to stderr and syslog (with
    # facility LOG_DAEMON).  stderr disappears when daemon goes to bg.
    # logfile: "//var/log/nsd.log"

    # File to store pid for nsd in.
    # pidfile: "/run/nsd/nsd.pid"

    # The file where secondary zone refresh and expire timeouts are kept.
    # If you delete this file, all secondary zones are forced to be
    # 'refreshing' (as if nsd got a notify).  Set to "" to disable.
    # xfrdfile: "//var/db/nsd/xfrd.state"

    # The directory where zone transfers are stored, in a subdir of it.
    # xfrdir: "/tmp"

    # don't answer VERSION.BIND and VERSION.SERVER CHAOS class queries
    # hide-version: no
    hide-version: yes

    # version string the server responds with for chaos queries.
    # default is 'NSD x.y.z' with the server's version number.
    # version: "NSD"

    # identify the server (CH TXT ID.SERVER entry).
    # identity: "unidentified server"
    identity: "Home network authoritative DNS"

    # NSID identity (hex string, or "ascii_somestring"). default disabled.
    # nsid: "aabbccdd"

    # Maximum number of concurrent TCP connections per server.
    # tcp-count: 100

    # Maximum number of queries served on a single TCP connection.
    # By default 0, which means no maximum.
    # tcp-query-count: 0

    # Override the default (120 seconds) TCP timeout.
    # tcp-timeout: 120

    # Maximum segment size (MSS) of TCP socket on which the server
    # responds to queries. Default is 0, system default MSS.
    # tcp-mss: 0

    # Maximum segment size (MSS) of TCP socket for outgoing AXFR request.
    # Default is 0, system default MSS.
    # outgoing-tcp-mss: 0

    # Preferred EDNS buffer size for IPv4.
    # ipv4-edns-size: 4096

    # Preferred EDNS buffer size for IPv6.
    # ipv6-edns-size: 4096

    # statistics are produced every number of seconds. Prints to log.
    # Default is 0, meaning no statistics are produced.
    # statistics: 3600

    # Number of seconds between reloads triggered by xfrd.
    # xfrd-reload-timeout: 1

    # log timestamp in ascii (y-m-d h:m:s.msec), yes is default.
    # log-time-ascii: yes

    # round robin rotation of records in the answer.
    # round-robin: no

    # minimal-responses only emits extra data for referrals.
    # minimal-responses: no

    # refuse queries of type ANY.  For stopping floods.
    # refuse-any: no

    # check mtime of all zone files on start and sighup
    # zonefiles-check: yes

    # write changed zonefiles to disk, every N seconds.
    # default is 0(disabled) or 3600(if database is "").
    # zonefiles-write: 3600

    # RRLconfig
    # Response Rate Limiting, size of the hashtable. Default 1000000.
    # rrl-size: 1000000

    # Response Rate Limiting, maximum QPS allowed (from one query source).
    # If set to 0, ratelimiting is disabled. Also set
    # rrl-whitelist-ratelimit to 0 to disable ratelimit processing.
    # Default is on.
    # rrl-ratelimit: 200

    # Response Rate Limiting, number of packets to discard before
    # sending a SLIP response (a truncated one, allowing an honest
    # resolver to retry with TCP). Default is 2 (one half of the
    # queries will receive a SLIP response, 0 disables SLIP (all
    # packets are discarded), 1 means every request will get a
    # SLIP response.  When the ratelimit is hit the traffic is
    # divided by the rrl-slip value.
    # rrl-slip: 2

    # Response Rate Limiting, IPv4 prefix length. Addresses are
    # grouped by netblock.
    # rrl-ipv4-prefix-length: 24

    # Response Rate Limiting, IPv6 prefix length. Addresses are
    # grouped by netblock.
    # rrl-ipv6-prefix-length: 64

    # Response Rate Limiting, maximum QPS allowed (from one query source)
    # for whitelisted types. Default is on.
    # rrl-whitelist-ratelimit: 2000
    # RRLend

# Remote control config section.
# remote-control:
    # Enable remote control with nsd-control(8) here.
    # set up the keys and certificates with nsd-control-setup.
    # control-enable: no

    # what interfaces are listened to for control, default is on localhost.
    # control-interface: 127.0.0.1
    # control-interface: ::1

    # port number for remote control operations (uses TLS over TCP).
    # control-port: 8952

    # nsd server key file for remote control.
    # server-key-file: "//etc/nsd/nsd_server.key"

    # nsd server certificate file for remote control.
    # server-cert-file: "//etc/nsd/nsd_server.pem"

    # nsd-control key file.
    # control-key-file: "//etc/nsd/nsd_control.key"

    # nsd-control certificate file.
    # control-cert-file: "//etc/nsd/nsd_control.pem"


# Secret keys for TSIGs that secure zone transfers.
# You could include: "secret.keys" and put the 'key:' statements in there,
# and give that file special access control permissions.
#
# key:
    # The key name is sent to the other party, it must be the same
    #name: "keyname"
    # algorithm hmac-md5, or sha1, sha256, sha224, sha384, sha512
    #algorithm: sha256
    # secret material, must be the same as the other party uses.
    # base64 encoded random number.
    # e.g. from dd if=/dev/random of=/dev/stdout count=1 bs=32 | base64
    #secret: "K2tf3TRjvQkVCmJF3/Z9vA=="


# Patterns have zone configuration and they are shared by one or more zones.
#
# pattern:
    # name by which the pattern is referred to
    #name: "myzones"
    # the zonefile for the zones that use this pattern.
    # if relative then from the zonesdir (inside the chroot).
    # the name is processed: %s - zone name (as appears in zone:name).
    # %1 - first character of zone name, %2 second, %3 third.
    # %z - topleveldomain label of zone, %y, %x next labels in name.
    # if label or character does not exist you get a dot '.'.
    # for example "%s.zone" or "zones/%1/%2/%3/%s" or "secondary/%z/%s"
    #zonefile: "%s.zone"

    # If no master and slave access control elements are provided,
    # this zone will not be served to/from other servers.

    # A master zone needs notify: and provide-xfr: lists.  A slave
    # may also allow zone transfer (for debug or other secondaries).
    # notify these slaves when the master zone changes, address TSIG|NOKEY
    # IP can be ipv4 and ipv6, with @port for a nondefault port number.
    #notify: 192.0.2.1 NOKEY
    # allow these IPs and TSIG to transfer zones, addr TSIG|NOKEY|BLOCKED
    # address range 192.0.2.0/24, 1.2.3.4&255.255.0.0, 3.0.2.20-3.0.2.40
    #provide-xfr: 192.0.2.0/24 my_tsig_key_name
    # set the number of retries for notify.
    #notify-retry: 5

    # uncomment to provide AXFR to all the world
    # provide-xfr: 0.0.0.0/0 NOKEY
    # provide-xfr: ::0/0 NOKEY

    # A slave zone needs allow-notify: and request-xfr: lists.
    #allow-notify: 2001:db8::0/64 my_tsig_key_name
    # By default, a slave will request a zone transfer with IXFR/TCP.
    # If you want to make use of IXFR/UDP use: UDP addr tsigkey
    # for a master that only speaks AXFR (like NSD) use AXFR addr tsigkey
    #request-xfr: 192.0.2.2 the_tsig_key_name
    # Attention: You cannot use UDP and AXFR together. AXFR is always over
    # TCP. If you use UDP, we higly recommend you to deploy TSIG.
    # Allow AXFR fallback if the master does not support IXFR. Default
    # is yes.
    #allow-axfr-fallback: yes
    # set local interface for sending zone transfer requests.
    # default is let the OS choose.
    #outgoing-interface: 10.0.0.10
    # limit the refresh and retry interval in seconds.
    #max-refresh-time: 2419200
    #min-refresh-time: 0
    #max-retry-time: 1209600
    #min-retry-time: 0
    # Slave server tries zone transfer to all masters and picks highest
    # zone version available, for when masters have different versions.
    #multi-master-check: no

    # limit the zone transfer size (in bytes), stops very large transfers
    # 0 is no limits enforced.
    # size-limit-xfr: 0

    # if compiled with --enable-zone-stats, give name of stat block for
    # this zone (or group of zones).  Output from nsd-control stats.
    # zonestats: "%s"

    # if you give another pattern name here, at this point the settings
    # from that pattern are inserted into this one (as if it were a
    # macro).  The statement can be given in between other statements,
    # because the order of access control elements can make a difference
    # (which master to request from first, which slave to notify first).
    #include-pattern: "common-masters"


# Fixed zone entries.  Here you can config zones that cannot be deleted.
# Zones that are dynamically added and deleted are put in the zonelist file.
#
#zone:
    # name: "example.com"
    # you can give a pattern here, all the settings from that pattern
    # are then inserted at this point
    # include-pattern: "master"
    # You can also specify (additional) options directly for this zone.
    # zonefile: "example.com.zone"
    # request-xfr: 192.0.2.1 example.com.key

    # RRLconfig
    # Response Rate Limiting, whitelist types
    # rrl-whitelist: nxdomain
    # rrl-whitelist: error
    # rrl-whitelist: referral
    # rrl-whitelist: any
    # rrl-whitelist: rrsig
    # rrl-whitelist: wildcard
    # rrl-whitelist: nodata
    # rrl-whitelist: dnskey
    # rrl-whitelist: positive
    # rrl-whitelist: all
    # RRLend

# zone configuration files
include: "etc/nsd/nsd.conf.d/*.conf"
ゾーンファイル
上記設定ファイルで、ゾーン情報については外部の設定ファイルを読み込む形にしています。 外部の設定ファイルを作成し、適時正引き、逆引き用のゾーンファイルを編集します。
$ cd /etc/nsd
$ sudo mkdir nsd.conf.d zones
/etc/nsd/nsd.conf.d/zone-example.com.conf
zone:
    name: "example.com"
    zonefile: "exmaple.com.zone"
/etc/nsd/nsd.conf.d/zone-example.com.rev.conf
zone:
    name: "1.168.192.in-addr.arpa"
    zonefile: "example.com.rev.zone"
正引きゾーンファイル
/etc/nsd/zones/example.com.zone
$TTL 1W
@       IN      SOA     server.example.com. root.example.com.  (
                                      2020010101 ; Serial    # 数字は自由に変えられる
                                      28800      ; Refresh
                                      14400      ; Retry
                                      604800     ; Expire - 1 week
                                      86400 )    ; Minimum
                   IN  NS      server.example.com.
                   IN  A       192.168.1.100

server          IN  A       192.168.1.100
pc1              IN  A       192.168.1.2
pc2              IN  A       192.168.1.3
pc3              IN  A       192.168.1.4
mobile         IN  A       192.168.1.5
printer         IN  A       192.168.1.6
逆引きゾーンファイル
/etc/nsd/zones/example.com.rev.zone
$TTL 1W
@                       IN SOA  server.exmaple.com. root.example.com. (
                                        2020010101 ; Serial    # 数字は自由に変えられる
                                        3H              ; Refresh
                                        15M             ; Retry
                                        1W              ; Expire
                                        1D )            ; Minimum
                           IN NS   server.example.com.

100                     IN PTR  server.example.com.
NSD の起動
設定ファイル、ゾーン情報ファイルを編集後、NSD を起動します。
$ sudo systemctl start nsd
正常に起動していることを確認します。
$ systemctl status nsd

● nsd.service - NSD Name Server Daemon
     Loaded: loaded (/usr/lib/systemd/system/nsd.service; enabled; vendor preset: disabled)
     Active: active (running) since Thu 2020-01-23 18:54:32 JST; 4h 20min ago
   Main PID: 416 (nsd)
      Tasks: 6 (limit: 18787)
     Memory: 214.9M
     CGroup: /system.slice/nsd.service
             ├─416 /usr/bin/nsd -d -c /etc/nsd/nsd.conf
             ├─422 /usr/bin/nsd -d -c /etc/nsd/nsd.conf
             ├─506 /usr/bin/nsd -d -c /etc/nsd/nsd.conf
             ├─508 /usr/bin/nsd -d -c /etc/nsd/nsd.conf
             ├─509 /usr/bin/nsd -d -c /etc/nsd/nsd.conf
             └─510 /usr/bin/nsd -d -c /etc/nsd/nsd.conf

 1月 23 18:54:32 systemd[1]: Started NSD Name Server Daemon.
家庭内ドメインにあるホスト名を家庭内DNSサーバに問い合わせ
NSDはDNSコンテンツサーバの機能しか持たないため、自身の保持しているホストテーブルに記載されているホスト名しか解決できません。そのためインターネット上にある各ホストの名前までは解決できず、他のDNSサーバに問い合わせる必要があります。
通常、家庭用ルータやHGWにはDNSサーバが備わっており、自身で解決できないホスト名を上位DNSサーバに問い合わせを行うDNSリゾルバの機能を備えています。クライアント側で指定するDNSサーバは家庭用ルータやHGWを設定します。
また、家庭用ルータやHGWには、特定の宛先ドメインのみ特定のDNSサーバに問い合わせを転送する機能を持つものがあります。これは「ローカルドメイン問合せテーブル」や「DNSルーティング設定」といった名称で呼ばれています。こちらの機能を使い、ドメイン「example.com」については家庭内DNSサーバへ問い合わせを投げる設定を施します。
以下はHGW「PR-400KI」での設定例です。
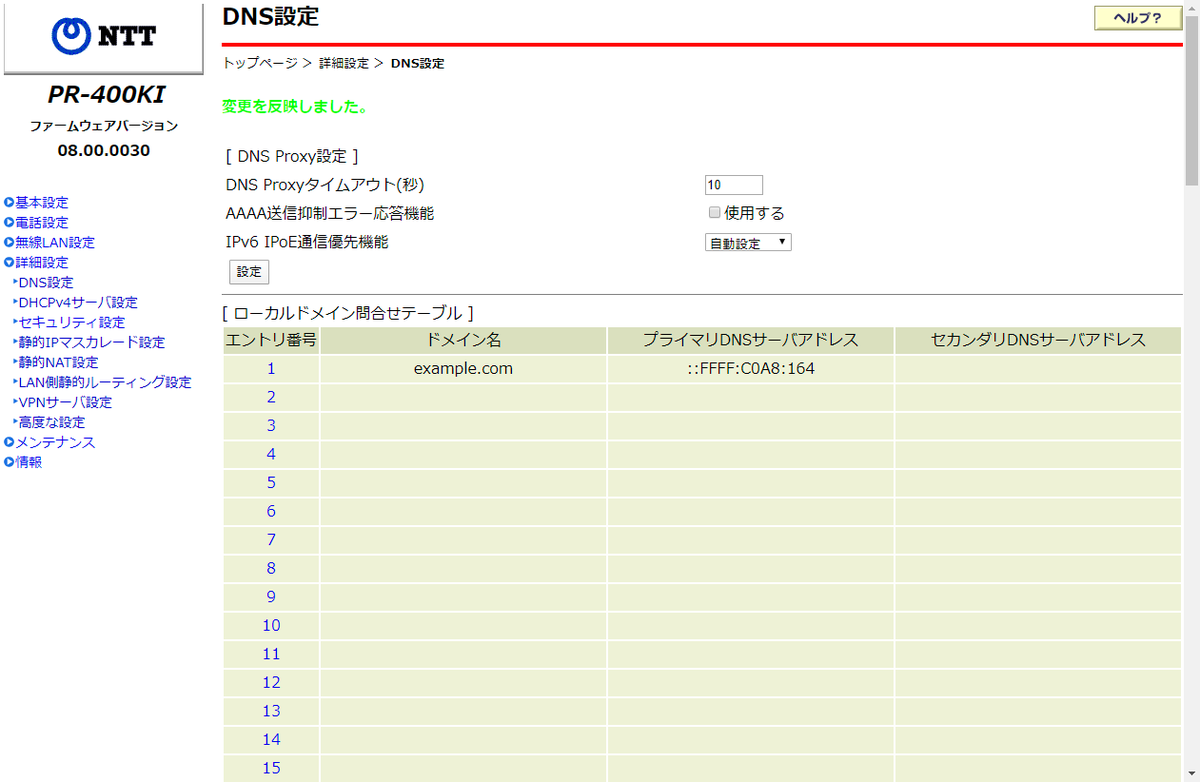
ドメイン名を「example.com」とし、プライマリDNSサーバアドレスを「::FFFF:C0A8:164」と指定します。「::FFFF:C0A8:164」はIPv4アドレス「192.168.1.100」をIPv6形式に変換したものです。
各クライアントからのDNS問い合わせ
Windowsから問い合わせを行い、以下のように応答があれば正常です。
> nslookup pc3.example.com
サーバー:  UnKnown
Address:  XXXX:XXXX:XXXX:XXXX:XXXX:XXXX:XXXX:XXXX   # DNSサーバのIPアドレス

名前:    pc3.example.com
Addresses:  192.168.1.4
以上の名前解決の流れは以下のような形となります。家庭内LANのホストについては家庭内DNSサーバで名前解決しています。

